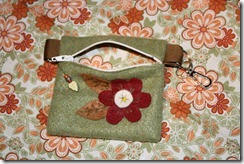
Welcome to my first attempt at a tutorial, I hope it makes sense!
I’ve been an admirer of the coin purses made by Kirie at http://shape-moth.blogspot.com for awhile now. I’ve made a few over the past couple of months, and have been in the mood to begin AND finish something quickly lately, so I thought I’d attempt a coin purse tutorial:

Step 1: Gather your materials. I've been wanting to use this retro flower print as a liner for awhile, so I dug through my felt collection to see what I had to match. I also keep a few zippers on hand, this one is made with a 4" zipper, but a 5" would work well also.

Step 2: Determine the size of your coin purse as well as your design for the front. I made mine 5” wide by the width of the felt sheet (about 8”). For the front, in the past I've made felt flowers, leaves, etc. I tried cutting a few flowers for this one, but didn't like how they turned out, so I decided on something I haven't done before... strips of various colors that I will "quilt" with my fancy stitches on my sewing machine.

Step 3: Complete your front design. This one was easy and fast since I just used my sewing machine. In the past I’ve hand sewn flower, leaves, branches, etc. with embroidery floss and occasional beads. That takes a bit more time, but the results are awesome! I’ll show some off at the end of the tutorial.

Step 4: Cut your liner fabric the same size as your coin purse fabric. Get your zipper ready to attach.
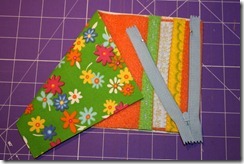
Step 5: Lay your lining and your felt shell WRONG sides together. Unzip your zipper and align it face down on top of one of the felt edges of the outer layer. Attach the zipper using your machine’s zipper foot.

Step 6: Fold the coin purse in 1/2 laying the right sides of the outer layer together. Align the unattached side of the zipper with the other edge of the purse. Attach the zipper to the inner and outer layers of the coin purse.

Step 7: Kinda hard to see here, but once the zipper is attached, zigzag stitch down the raw edge of the zipper and fabric layers on both sides. Don’t forget to swap your sewing machine feet back!
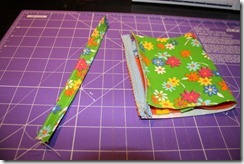
Step 8: Using extra fabric scraps or ribbon, make a narrow strip for the clip loops. I made this one prior to this tutorial, starting with a 3 inch wide piece, folding it in half, then each 1/2 in half again, sewing the clean edges together.

Step 9: Cut your strip or ribbon to the desired loop size and thread the clip or ring onto the loop.

Step 10: Insert the loop into the inner part of the purse, lining the raw edge of the loop with the raw edge of the coin purse. You may want to pin it in place at this point. Align the zipper edges together and pin as well.

Step 11: Sew the raw edges together down the side of the purse. Sew as close to the zipper stopping point as possible, or you could sew inside the stopping point. Trim the edges down to 1/4 inch then zigzag stitch it. If you’d like a second attachment or ring on the opposite side, repeat step 10, then step 11 down the other side of the coin purse.

Step 12: Invert your purse through the zipper, using a pencil to poke the corners into shape.
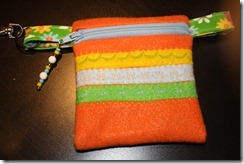
Step 13: Final step! Yea! As a purely decorative touch, find some cute beads to hang off the zipper pull. You could also use buttons. I used a wire flathead pin looking thing that I found in the beading department at my local Joann’s. They came in a bag of 100 or so for about $3. Less if you use your coupon! I used needle nose pliers to bend the top through the zipper pull.
Whaaa Laa! One completed coin purse! You can of course vary sizes, dimensions, zipper placement, etc. Endless possibilities! And as promised, here are some of the others I’ve made: